Showing posts with label Sew. Show all posts

Friday, November 8, 2013

Goodie bags

Okay world, I am back. I think.

Life has been full since the arrival of the munchkin, to the extent that I feel there aren't enough hours in a day. The week goes by fast, and the weekend even faster. Baby A is doing great, she'll be five months in ten days!

Now for the goodie bags that this post is about (I know, I digress. Way too often.)
Early September we hosted our first family reunion ever. We all had so much fun that we're confident this is a family tradition in the making. Our nieces (ages 4 - 10) were visiting us for the first time and I wanted to get them presents. But it is really difficult to shop for kids these days, what with all the handhelds and iPads and dolls. They seem to have everything already! I really thought this one out (eReaders to dolls to artsy stuff to books, whatnot!) and realized that for children it is the sheer count that counts! So I went about buying trinkets - dry erase boards, head bands, scrunchies, flashlight keychains, bubbles, snap on bracelets, jump rope, word puzzles, jigsaw puzzles, nice notebooks, pens and the likes. I kept the puzzles age appropriate, the older girls got harder word puzzles and more pieces in their jigsaws.


When it was time to pack it all in, I almost went ahead and picked out gift bags at the store. Almost. Put 'em back, came home and made these drawstring backpacks for them instead!


These were simple and inexpensive, the girls loved them and the labels really impressed the family :)
And it gets better - I got these fabric markers that the kiddos used to personalize their bags. I sat with them as they made rainbows and faces and flowers and wrote their names, and helped them stick eyes to the faces (with fabri-tac) and tied jingle bells to their bags for them! We had fun, the girls had something to do while the elders played and they each got a bag to take home with them.

My favorite part was when Suhani looked at me and said - "This is the coolest gift ever!"
I love those girls, am so looking forward to seeing them next year!


Monday, June 17, 2013

Nurse Thank you Gifts

I put together these cute bags for my nurses, for when I have my baby. I made drawstring bags, and filled them up with goodies that most people would like and use.


Not knowing how many I'll end up needing, I made five. I hope these suffice.


Saturday, March 23, 2013

Slip Cover


I made a slipcover of the same purple flannel that you saw in this recent post, mainly because I had just enough left for one slipcover. A few scraps are all I have left of it!


Slipcover V1.0 had the zipper on top, as in the video I pointed to in this post, and it took a little lot of wrestling to get the cover onto the pillow. So I called that the Beta version, fixed the bug and re-did the zipper and placed it on the curved side, this way the cover slides on easily. Slipcover 2.0 :)


And cover #2 with the cute girl silhouettes got a random splatter of green & pink buttons on an improvised closure mainly dictated by the amount of fabric I had! I think I did a pretty good job of lining up the prints where I had to join leftovers.


So there you have it, two slip covers on an oversized boppy pillow, all for less than twenty bucks (I got the polyfill at 50% off, the fabrics were all remnants/purchased on sale). 

Thursday, March 14, 2013

Kimono tops

I set up a mini assembly line today, and just finished making a these kimono tops -


These are great scrap busters! As little as 13 inches of fabric does it, so I guess I'll be raiding the remnant bin again soon!

One of the two identical whites is for my friend's baby girl :)

Sunday, March 10, 2013

Zippered up!

The fabric cut out from the nursing pillow *had* to be sewn into a zippered pouch! And when things are meant to be, they just come together :) I found the perfect zipper in my box and the resulting pouch was so cute that I had to make two more!! 


Saturday, March 9, 2013

Itty bitty V2.0

More itty-bitty dresses, lined with light white cotton this time. Made two of a kind, one for me and one for a friend who recently had a baby girl! It was the perfect project for a remnant I picked up at Joanns, a tiny rectangle is all there is left of it now.


This one got two flowers and some piping for embellishment -

And this one, two cute smileys. As the baby grows, that button can simply be moved up so the dress continues to fit her till she outgrows the bodice.

Tuesday, March 5, 2013

Be..bop...boppeee

You need something, you google it, and voila!
The blog-land has had generations of smart & thrifty citizens inhabit it before I was born into it, so I always find what I'm looking for.

This time around, I wanted to make myself a nursing pillow, and found one of the clearest set of instructions here. When I downloaded the pattern, I felt there's no way this pillow is going to fit around my waist after I've delivered (now, I don't speak from experience, but I've read plenty of real momma posts that say that I'm going to have the girth of five months along for about a month after I've delivered). So I knew I had to re-size the pattern.

Given that the Boppy is basically a blown up travel pillow, I knew it wouldn't be rocket science and went about trying it out.

I started with the downloaded pattern for reference, and made changes. You can see that the drawing on the right allows a bigger waist to fit in :)


I also added two inches to the center of the "C" where the baby will rest - only faintly visible in the picture above.

For the pillow form fabric I debated between white quilting cotton and thick IKEA cotton from my stash, and settled on the IKEA fabric because it is almost as thick and sturdy as denim so would make for a stable pillow form.

Sewing it was simple - cut two pieces on the fold, pin 'em right sides together and sew them with a 1/2 inch seam, leaving a 6-7 inch opening to turn it out and stuff.

Stuffing it firmly took about 25oz of fiberfill. I left my opening on the side (not on top as instructed in the video) because the center of the pillow is where the baby rests, so it should be the firmest part. And I felt that I could not have stuffed it as firmly if that's where the opening would have been.


I like that the pillow does not look naked without a slip cover on it, but I do plan to make two slip covers, I am thinking flannel. With all the to-dos on my list, lets see when I get to it :)

In the mean time, the fabric cut out of the "C" is begging to be made into a zippered pouch. I mean, it is the perfect size!! I'm going to get straight to it!

Monday, February 25, 2013

Itty bitty cuteness

Been slow with the making stuff, but managed to complete this real cute itty-bitty dress in newborn size.


I used flannel, so did not line the bodice, just bias taped the edges. To give you an idea of the size, that bias tape is 1/4 inch :)

And made these things to thread the ribbon through, by chain stitching regular polyester sewing thread -


Wednesday, January 30, 2013

The bib with sleeves

So it turns out the bib with sleeves is a hit :)
You may or may not remember it from the frantic sewing that I did for the nephew during his last week here.

I did not have a pattern to begin with, but had a general idea of how I wanted to go about it. So I used one of his shirts that fit him well for measurement. I added an inch to each side so that he can get good use out of the bib.

On paper, the idea was to make it in three pieces - the body and two sleeves.


This is what the finished product looked like, front and back -


And with the cutest nephew wearing bib #2 (this one is a little shorter, and without the brown cuffs) -


If you wish to make one, you can find the PDFwith pattern pieces (and very amateurish instructions as well :)) here.

Sunday, January 27, 2013

In preparation...

Well, first I over-thought it to death!!
What all will we need to buy?
How much/how many?
What brand?

A stroller  a car-seat and a crib/place to sleep are the standard items on any parent to be's list and I have Jatan's brain to pick on those. What was overwhelming me was the DIY list (receiving blankets/burp rags/onesies/whatnots) that all those blogs recommended.

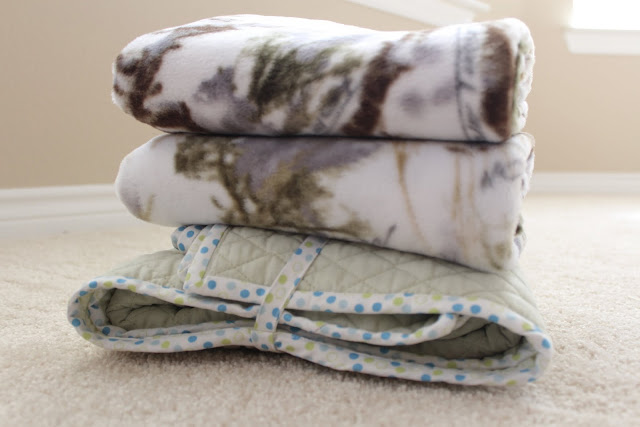
So for starters, I closed the 18 browser tabs that I'd read umpteen times and went through my stash of remnants and my unfinished projects. Found a piece of cozy fleece that made two baby blankets, and a piece of quilted cotton (with the batting sewn right in) that made a play mat!!

I hadn't sewn seams on fleece before, and this one got all stretchy when I turned the edges. So I undid the straight stitch and used the overlock on my machine instead. That has some give and the thread won't snap when the fabric stretches. Then ten minutes it in the dryer on the refresh cycle straightened up the edges. I also bound the quilted cotton with some bias tape I'd made  before. Two projects down, hurrah for the remnant bin!


That was a good start and I'm not going to let those lists overwhelm me.

Next, I am going to complete the basket weave blanket I'd started eons ago - only now, its going to be baby sized ;)

Wednesday, October 24, 2012

Princess bags

On our trip to New Jersey for the wedding, I wanted to take something for all girls in the family, from the 3 year old range to a teenager. Decided on little cross body purses that they can carry their knick-knacks in.

I used a green-pink home decor fabric that I'd picked up from the remnant bin at Joann's, along with a matching pink stretch linen for straps, and raw cotton for the inner lining. 

The construction was simple, the finished size of the purses is 6 x 8 inches, and the strap is ~60 inches end to end. The little ones tied a knot in their straps, and the mommies liked the fact that they'll be able to use those as they get taller.

I created name-charms and hung one on each purse, it was pleasantly surprising how happy it made them :)


Thursday, October 4, 2012

Frantic sewing

In the last couple of months, sewing has taken a back seat. To family. Before the nephew got here I made him some goodies and coz that wasn't enough I crammed in some late night sewing in his last week here.

Following Jess's bapron pattern I made him a bunch of these -


I made them with 1/4 inch and 1/2 inch bias tape, I think the thinner tape looks better. The one above is 1/2 inch, and is crumpled from washing. I know that is bad photo etiquette but with 18 month olds you've got to click when you can - I had a pressed bapron in the 1/4 inch tape variety on him one night, but he was so cranky that none of those pics do justice to the happy boy that he is.

So, the bapron was a lukewarm success. That is because when he sits at the table with us, he wants to feed himself (won't open his mouth when we'd try to feed him) and in the process gets his hands dirty. So I thought of making him a bib with sleeves. Basically a backless raglan sleeve shirt. Here is half of it. Please, pretty please, ignore the fact that the elephant is upside down. That is result of late late night cutting. And Jatan points out - It'll be the right side up when Aarush looks at it ;)

Rinku didi liked how this came out. Now she does not have to change his shirt three times a day :)

The back -

A binky strap that I felt like making 'cuz Aarush is a chatty baby; and while he is pretty good at holding the 'tutoo' between his seven teeth while he talks, he sometimes does drop it while we're talking up a storm. And perfect as Dana's timing is, she posted this about ten days ago.

This was super easy to make, and I love that the binky matches the ribbon :)
Rinku didi was very happy to see this and had it hanging on her purse at the airport - no more fishing in the bag when Aarush asks for his tutoo.


I also made a diaper cover a matching pouch. The pouch is the right size to fit the cover and two diapers in it. I used this pattern, also from Dana, what would I do without her blog :)

I wanted to make a couple more of these, but Aarush likes wearing pants better.

I hope to begin spending some time at my sewing table, lets see how that comes about.

Sunday, July 22, 2012

My precious!!

I've already received my birthday presents for this year :))
Way in advance, I know!
But do I mind?

From her work trip to NY, the sis got me a super-cute JC bracelet with four charms. Each charm came in its own box (I love those cute little boxes with their magnetic closures!!) and I got to put the bracelet together!

And the husband upgraded my sewing machine! Yayy!!

Wednesday, June 13, 2012

I made a quilt!!

Well, sorta!!

I wanted to make a simple gift for my sister in law's son for when they visit in July. Something that can be his for some time to come, so decided on a small blanket. When I walked into Joann's I did not have any specifics in mind except soft & huggable :)

Spent some time browsing the flannel/fleece section and decided on this this print -


The "quilt" look without having to sew pieces together!! (the picture above mutes the colors a little, they are much brighter to look at!)

For the backing, I wanted something equally soft so I picked up a co-ordinating piece of butter-yellow fleece.

Keeping in mind the difference in width (fleece is 60 inches, where as flannel is 42) I purchased a yard of the fleece and two of the flannel.

Pre washed them both because the two fabrics shrink very very very differently. Next I pinned the right sides together (the selvedge of the flannel lined up with the width of the fleece) and sewed the border all the way,  leaving a small opening for turning. Clipped corners and turned. Then top-stitched and quilted the two layers using the straight printed lines as guides. One super-cute blanket!!

As a last personal & personal-izing touch I cut out his name in felt and now the quilt is officially his!!


Wednesday, December 21, 2011

The sew-a-thon update...

Chocolate bags!!
Here is how I made them.
Start with a 14 by 6 inch rectangles. There isn't a size restriction here, so if you have 13 inches instead of 14, you'll be okay :) 

Fold it into half with the right sides together, so you get a 7 x 6 inch rectangle with three open sides. The only closed side is where you folded the fabric, this is to be the bottom of the bag. Crease this closed side well, we'll need the crease later.


Sew the longer (7 inch) open sides closed, and pink them so they are all cute!
Then, with the wrong side still out, 'open' one closed corner -


then fold it so that the crease at the bottom lines up with the stitch, like so -


Do this on both bottom corners, and pin them together so you have a structure like this -


Then about three quarters of an inch away from the folded corner, draw lines on both the corners -


and sew on them, reinforce well.

This will form a rectangular base to the bag, as compared to the corners sticking out when the bag is filled. Cut off the extra fabric from the corner so you have -

 Turn it the right side out and you can see -

The bag has a nice rectangular bottom :)

Next its time to sew the top and put in drawstrings. For that, flatten your stitches -

And with your dial on zig-zag, length zero, make a couple of stitches across the vertical stitch.


Am I still making sense??
(Basically, the vertical seam that you are seeing in the picture above is the 'vertical side' of the bag that you sewed shut. The drawstring of the bag will come out between the white stitching that you see, and the white stitch is what will prevent the vertical stitch from coming apart. Make those on both sides)

Then pink the only remaining, open edge - the top of the bag.
Then turn the bag right side out, and fold the top edge inside, upto the upper white stitch. And sew it closed -

Once done, carefully remove the stitches between the two white stitches. You will now have openings on either side of the bag.

Use a complimentary/contrasting ribbon for the drawstring. Make a couple more, fill em up with goodies and you are good!!

You may also like -