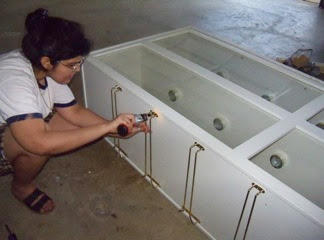
we almost (keyword - almost) completed our cabinet do-over.
This was a white cabinet, and before we bought the house, it was attached from the ceiling, above the bar like so -
But we did not want it there. So we had it removed -
The poor white elephant (literally!) was sitting in the garage all this while, waiting.
Three weeks ago we decided it was time to furnish our study - we had one small table. So on the infrequent weekends when my husband and I both had to work, it was plain inconvenient to use the study! Plus, his 'office' was to be his birthday present this year!
During the discussion, the topic of book cases came up. We almost bought a bunch of Billys from Ikea when I remembered the White Cabinet!!! Lets paint it and use it in the study!
It took ~3 leisurely weekends to get it this far, and I see one more day's work to make it red ribbon-worthy.
This is what it was, to begin with -
We did not need the wine-glass holders in the study ;) So off they go -
What we used -
- Valspar kitchen & bath enamel in soft gloss finish (this is the corresponding finish to 'semi-gloss' in other brands), stained flat black.
- Two brushes - a 1in and a 2.5 in - look for a good edge and smooth bristles. We looked at some cheaper ones, but they tend to leave bristles in the paint, that you have to later peel out. That ruins the finish.
- Painter's tape, the regular blue kind.
- 120 grit sand paper.
- And dear old elmer's wood filler.
There was a bunch of holes, get aplugging' -
Once all the putty dried, sand away -
Hear the *pop* -
The first streak! We've officially begun!
In the mean time we also set up a caster shop, and here's why -
The cabinet was originally hung from the ceiling but now it'd be on the floor. So it needed feet. Given the size and weight of the thing, we decided on casters. Three along each edge. 2in casters, 3 without brakes, 3 with.
Next question - how to fix them to the cabinet? The base is plywood, so just screwing them in simply won't do it. Hmm! Head on over to the lumber section and find pre-cut wooden blocks. These are machine cut so are exactly alike. Grab six. Grab 4 more, just in case ;)
Drill - check.
Bit - check.
Backup bit - check.
Backup bit - check.
Wood screws - check.
Marked hole locations on six blocks, pre drilled them, and got Jatan to fix them.
As the queue starts forming -
its time to start painting them. I used one of my old craft brushes for the purpose. Since the paint is latex, it rinses off with warm water.
These blocks were raw wood, so I should've primed them first. But I did not want to buy a pint of primer for six small blocks. So I just gave them an extra coat of paint.
And, done!
Then I used one block to draw where these would go on the cabinet, then used contact cement to attach -
The painting continued -
Later in the day we took the painting inside. The kitchen island was perfect height for setting up the cabinet doors :)
Making progress -
Both Sides done -
This is how it looked before it was turned over and had its flip-sides painted.
The cabinet and doors all got two coats of paint, and we waited patiently for those to dry.
We moved it to the study yesterday and attached the doors (and that involved some Math!).
Next, we've got to get stripes of contact paper on the inside - you see when the cabinet was made, it was painted white, and the glass panels were glued on. So the rabbet behind the glass is white, and it shows. What better way to mask that but contact paper!
So that's on the to-do for next weekend. I'll share pictures of the finished cabinet then.
Have a great week y'all!!


No comments:
Post a Comment